Saturday, December 3, 2011

48 Bean Soup


Not long ago, The Mr. and I walked into our favorite watering hole and wanted something to eat.  "Hey Johnny, what's the soup today?" I asked.

"I don't know... 48-bean soup or something like that," the barkeep answered.

"Forty-eight?" I doubted. 

"Well if you don't believe me, order it up and count 'em," Johnny smiled.

Well, I did order it.  And I did count them (but I got distracted after the tenth bean and lost count)  Really, it's not 48 Bean Soup.  To be honest, I don't even know if there are 48 different kinds of beans that exist.  It's actually 16 Bean soup, but the joke title stems from interactions we've continued having at this favorite pub regarding this soup. 

The Mr. and I love this soup, so whenever we go to the pub, I always ask Johnny what soup they're serving that day, hoping this is the one on the menu. His responses range anywhere from "18-bean" to "59-bean," depending on how mischievous he's feeling that day, but I seem to remember "48-bean" being the one he uses most as an answer. 

One day, a fellow patron overheard Johnny's response, and playfully exclaimed "That's a lie! There aren't even 48 different kinds of beans!"

"Yeah?" Johnny smirked, "Well order it up and count 'em if you don't believe me!"

Thus continues the joke of 48-bean soup.

Source:  based on the loose guidelines given to me from Gary, the cook

Ingredients

2 T. butter 
3 carrots, sliced
3 celery stalks, chopped
1 onion, chopped
1/2 tsp. minced garlic
12 c. water
1-2 ham hocks
1 lb. bag of 16 bean blend, presoaked and rinsed
Seasoning Packet (included in the bag of beans)
1 tsp. mustard powder
1/2 tsp. pepper
pinch of dried parsley
2 bay leaves
ham, cut into small cubes (I used cottage ham and cut it into small pieces)

Directions

1. In a large pot (I used my stock pot) melt the butter.  Saute the carrots, onion, celery, and garlic over medium high heat till onions are translucent.  

2.  Add the ham hocks, beans, seasoning packet, mustard powder, pepper, parsley, bay leaves, and water.  Bring to a boil. 

3.  Cover and reduce heat.  Simmer for 60 minutes.

4.  Remove ham hocks and add the cubed ham pieces. Continue simmering for 30 additional minutes.  While the soup simmers, trim any usable meat off of the ham bone and toss it back in the soup.  Discard the bone.

5.  Serve hot to warm up a cold, rainy day :)


Verdict: Keeper!!

Honestly, I'm pretty proud of my creation.  Next time, I will probably simmer the soup a bit longer before adding the ham pieces, simply because I like my beans mushier than they turned out here.  If I change anything with the ingredients, I may use a little less ham, or one ham hock instead of two (to cut down on the salt).  Other than that, this one definitely earns a permanent spot in the recipe box.

Sunday, October 16, 2011

Italian Spaghetti and Meatballs


"He that can have patience can have what he will." ~Benjamin Franklin 


Man, is this ever true.  Life has been pretty good to me, and in retrospect, I believe that it's partly due to the fact that I have always had enough patience to wait for the right people, the right timing, or right ideas to come to me.  This isn't to say that I have been completely passive over the years... I've worked hard, I've pursued my goals and dreams, but if I hit a roadblock, patience was always the vehicle that found the necessary detours to bigger and better things. 


For those of you who follow this blog, you know that I lost my job at the end of the last school year.  After seven years with the same district, I was another victim of our depressed economy.  Once the pain and shock wore off, I set my mind to finding and beginning the next chapter in my life.  I told myself that I had fulfilled my purpose for this period of time, and that now must be the time for me to help other students elsewhere.  Never have I claimed to be a follower of any particular religion, but I do believe that there is a Plan for all of us; and if we are patient enough, we will all hear the calling we are meant to hear. 


(Suuuuurre.  It's easy for me to say this now. But when I was interviewed, then subsequently denied, by several other districts, it wasn't very easy to sit back and wait for the Plan to happen!) 


As it turned out, I did land another teaching job, one that is very different than my old experiences.  But it's a new beginning with fresh new faces, philosophies, and challenges; one that has given me more opportunities to mentor young adults and share my love of reading, writing, and learning.  Patience persevered again. 


So to celebrate patience, here's a simple (yet time-consuming) recipe that has landed a permanent spot in my recipe box.  All good things come to those who wait, and you will have a delicious meal (or three!) if you're willing to wait a couple of hours for dinner. 


Source: allrecipes.com


Ingredients


Sauce: 
1/2 onion, chopped
5 cloves garlic, minced
1/4 c. olive oil
2 (28oz.) cans whole, peeled tomatoes
2 tsp. salt
1 tsp. sugar
1 bay leaf
1 (6oz.) can of tomato paste
3/4 tsp. dried basil
1/2 tsp. ground black pepper


Meatballs: 
1 lb. lean ground beef
1 c. bread crumbs
1 T. dried parsley
1 T. grated Parmesan cheese
1/4 tsp. ground black pepper
1/8 tsp. garlic powder
1 egg, beaten


Directions:


For the meatballs-- 


1.  Combine all ingredients and mix well with hands. 
2.  Separate and roll into 12 large balls. 
3.  Refrigerate (covered) till needed. 


For the sauce-- 
1.  Saute onion and garlic in olive oil over medium-high heat till onion is translucent. 
2.  Stir in tomatoes, salt, sugar, and bay leaf.  Bring to a boil. Reduce to low, simmering for 90 minutes. 
3.  Stir in tomato paste, basil, pepper, and meatballs.  Simmer another 30 minutes. 


Verdict: Keeper! 


This is one of those meals you can make on a Sunday and reheat multiple times for quick meals on busy weeknights, because the flavors blend so well over time.  


If I change anything, I may try Italian breadcrumbs instead of the plain.  

Tuesday, July 12, 2011

Glazed Salmon


This is it! 


This is the recipe I'm going to use for The Mr. to try and hook him on fish (ha.... ha..... ha...... that pun was terrible....) 


If you haven't figured it out by now, we are Carnivores.  While I know it's not the healthiest mentality, the majority of our meals include meat of some kind.  Since there are so many benefits to including fish in our diet, I'd like to have it for dinner more often-- but there's a problem with that.  The Mr. has never liked fish. 


Thus began my search for The Recipe that would help unlock this avenue of nutrition.  The Mr. has always said that if I make it, he'll be willing to try it.  So I began my quest to find a dish that he might be able to eat once in awhile at home.  One night, we were out at Bravo's and I ordered a grilled salmon dish.  It was so delicious, I had to see The Mr.'s reaction to it.  So I offered him a bite.  


"Wow, that's really good.  It tastes like a white steak!" 


Yahtzee! 


Later on, I found this recipe online.  Being a teacher gives me the luxury of cooking whatever I want for lunch in the summertime, so the other day, I tried this one for myself.  (Hey, if I'm going to try it on The Mr., I need to make sure that I love it as well!)  


Source:  modified from Allrecipes.com


Ingredients: 


1/4 c. olive oil


3 T. honey


1 tsp. minced garlic


3/4 tsp. grated lemon peel 


2 salmon fillets


Directions: 


1. Prepare the grill grate with aluminum foil.  Spray nonstick cooking spray on the foil.  


2.  Combine oil, honey, garlic, and lemon peel. Reserve half for serving.  


3.  Grill salmon, uncovered, on medium heat for 6-8 minutes on each side (or till it it flakes easily with a fork).  Baste with glaze mixture frequently. Serve with reserved glaze. 


Verdict:  Keeper!


Although the next time, I may use molasses instead of honey, just to see how that bolder flavor works in the glaze. 

(... and once The Mr. has a chance to enjoy this, I'll let you know what he thinks, too :)) 


Monday, July 11, 2011

White Chocolate Oatmeal Cookies


(A.K.A. "Sweet Heavenly Deliciousness")


Do not adjust your computer settings...


Yes, this IS still the same blog you've been reading all along.  And yes.  Those are COOKIES that I actually made in my kitchen!


In my adult life, I've decided that sweets just don't do it for me like they do for others.  So many other people I know go ape-crazy over cakes, cookies, pies, and other sugary goodness, but it's never been like that for me.  Even as a kid I can remember my cousin devouring the candies laid out in our Grandma's candy dish, but I was never drawn to them in the same manner. My weaknesses usually involve deep-fried, carb-loaded, savory foods rather than baked goods or candies.  As a result, I'm not much of a baker.


:::insert sad trombone sound on The Mr.'s behalf::::


But it was the 4th of July, and we were both home enjoying the freedom of the holiday, when I got the notion to bake something. 


I did a quick search online to match the ingredients I already had on hand, and found this one.  


Source: www.allrecipes.com


Ingredients:


1 c. butter, softened
1 c. light brown sugar
1 c. sugar
2 eggs
2 tsp. vanilla extract
3 c. flour
1 tsp. baking powder
1 tsp. baking soda
1 tsp. salt
1 1/2 c. oats
2 c. white chocolate chips (I used one full bag... 15 oz. perhaps?)
1 c. chopped pecans
raspberry jam (seedless) 


Directions: 


1.  Preheat oven to 350 degrees.  Lightly grease cookie sheets. 


2.  In a stand mixer, cream together butter, brown sugar, and white sugar. 


3. Stir in eggs and vanilla extract. 


4.  Combine flour, baking powder, baking soda, and salt.  Slowly add flour mixture to creamed mixture. 


5.  Add oats, white chocolate chips, and pecans.  You may want to use your hands for this part, since the dough was starting to get stiff. 


6.  Roll into 1-1 1/2 inch balls, and place onto cookie sheets.  Lightly press the dough into a little "pool," then add a small spoonful of raspberry jam (optional-- I added this part just because I LOOOOOVE the taste of white chocolate and raspberry together). 


7.  Bake for 10-12 minutes.  Remove to cool on wire rack. 


This is how they looked with the raspberry jam... pay no attention to the fact that there's only one left! :) 


Verdict: Keeper! 


Even though I'm not typically a baker, this is something I could get into.  The cookies came out perfectly, which means they were chewy enough so that I could eat them without a glass of milk (although, the cookie experience is always heightened by a glass of milk, in my humble opinion).  


And The Mr. could definitely get into this... since he has something of a sweet tooth. :) 

Sunday, June 19, 2011

Ranch & Bacon Pasta Salad and Italian Pasta Salad


Hello readers! 


(That is, if I still have any readers... )


The last couple of months have taken their toll on me.  In April, I learned that my position within my district was being eliminated, and that after seven years of service, I would be unemployed for the upcoming school year.  Needless to say, I was not only heart-broken, but completely unprepared for all the impending job-hunt would entail.  Like Time.  The amount of time I have spent rewriting my resume, filling out applications, checking online recruiting databases, and crafting well-thought responses to the written components of applications really surprised me... which is one reason I haven't written to you in so long.  


But the other reason I haven't blogged recently is more emotional than anything.  Truth told, I think I've been working through a sort of depression that I haven't experienced before.  These last few months have been very foggy for me.  My determination, ambition, and creativity were replaced with apathy and insecurity in all aspects of my life (which includes the kitchen!) 


Thankfully, I have had a few interviews in these early weeks of summer, and this simple fact has done wonders for my outlook.  And this has led me back into the kitchen-- which is good, because I have a cookout celebrating a friend's birthday coming up, and I needed to get crackin' with a side dish or two to share. 


Ranch & Bacon Pasta Salad 
(Modified from allrecipes.com) 


Ingredients: 
1 box of bow-tie pasta
1 1/2 c. light ranch dressing
1 c. mayonnaise
1 bunch of green onions, chopped (I included the scallions as well) 
1/2 pkg. grape tomatoes, halved
1 lb. bacon (cooked, drained, and crumbled) 


Directions: 


1.  Cook pasta according to directions. Drain, and set aside to cool. 


2.  In a large bowl, combine ranch, mayonnaise, green onions, and tomatoes. After cooling the pasta with running water, add to large bowl and mix thoroughly.  


3.  Before serving, add bacon crumbles to top of the dish.  Serve chilled. 


Verdict: Keeper, with revision


I am CRAZY for creamy pasta salad, so this was a hit for me.  But I think I can do better.  Next time, I might try using a ranch-dressing season packet mixed with mayo (instead of the dressing) to see how it affects the overall flavor.  Also, I might try using pre-cooked bacon crumbles, just to see if the time saved is worth it compared to the flavor of real bacon. 


Italian Pasta Salad


Ingredients: 


1 box of tri-color pasta 
1 small can of black olives, sliced
1 pkg. cheese cubes
1/2 red onion, chopped. 
1 bottle of Italian dressing (I used Kraft Zesty Italian)


Directions: 


1.  Cook pasta according to directions on box. Drain and rinse with cool water. 


2.  In a large bowl, combine red onion, olives, cheese, and pasta.  Mix well.  Stir in Italian dressing.  


3.  Refrigerate a few hours or more before serving.  


Verdict: Keeper


My friend (the birthday girl/hostess of the cookout) asked me what dressing I used because she liked it so much.  This style of pasta salad instead my favorite-- but since it's kind of a "standard" pasta salad, I'll use this in the future when feeding others who want Italian pasta salad.   

Sunday, March 27, 2011

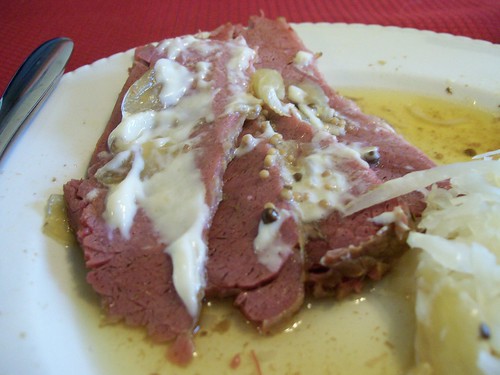
Corned Beef Brisket

100_1990 by jarmstrong23
100_1990, a photo by jarmstrong23 on Flickr.
Sorry it's been awhile since my last post-- 2 months, to be a little more exact. Life seems to speed up when all you really want is for it to slow down, and as a result, I haven't been as adventurous with my cooking as I'd like to be.

With all the new recipes I read and save each week, I'm never at a loss for new ideas. Time to think and plan, however, is another story. Trying a new recipe, for me, requires some "think-time" (as we teachers like to call it). I like to mull an idea over in my head before executing the plan, and when life speeds up that time slips away.

Today I decided that enough was enough, and that I would take 10 minutes to blog a meal that I'm trying for the first time: Corned Beef Brisket. With St. Patrick's Day well behind us, I have had some time to read all the recipes others use for this traditional dish. For some reason, I found myself drawn to the CrockPot method. :) (You all know how much I love this appliance, and a hands-off recipe is just what I needed for this hectic time of year.)


Source: Adapted from Fisch Foods


Ingredients:

3-4 lbs. corned beef brisket, plus seasoning packet

1 onion, sliced

1 c. chicken broth

1 T. Worchestershire sauce

Sprinkle of red pepper flakes

Directions:

Line bottom of CrockPot with onion.

Thoroughly rinse brisket and place atop the onions.

Combine chicken broth and worchestershire sauce. Pour over brisket. Add red pepper flakes and seasoning packet.

Cook on LOW for 5 1/2 to 6 hours.

Verdict: KEEPER!

The meat was so tender and flavorful... I can't wait to make sandwiches with the leftovers! Tonight I served it with sauerkraut and horseradish sauce, and The Mr. was practically drooling :) We will definitely use this again.

Sunday, January 30, 2011

BBQ Ribs


If I don't make goals for myself, nothing happens. As an example, I made a New Year's resolution two years ago to cook at home more often.  At the time I was depending on drive-thru's and takeout for dinner every night, and I was tired of spending all the extra money (you all know how cheap I am by now, so that was a huge motivator for me!) Flashforward to today, and it's now a common practice for us to have dinner at home 3-4 nights out of the week. We're saving money, relaxing more at home, and enjoying the thrill of making new dishes that we'd otherwise get at a restaurant. Progress!

So it only makes sense that I make another culinary goal for myself.  This year, I want to be less dependent on recipes and exact measurements.  (Yeah, I know... it's a cheater goal because I already hate measuring... but hear me out.) It takes a confident cook to just put a bunch of ingredients together and create a meal-- and I'm not there yet. 

But, if I am to grow as a cook, I need to learn to trust my instincts.  If I want to make something, but cannot seem to find "the perfect recipe" for it, I should be able to come up with something on my own.

And today, I did!


Ingredients:

ribs (I had some frozen, and I didn't bother to thaw them)

2 cans of beer (I used Miller Lite this time)

1 onion, quartered

garlic salt (Enough shakes to coat the top of the ribs/liquid)

pepper (Enough shakes to coat the top of the ribs/liquid)

brown sugar (I just placed a handful of brown sugar on top of the
ribs, then spread around to create a thin layer).

BBQ sauce (Montgomery Inn, anyone?)

Directions:

Pour beer into CrockPot.

Place onion in beer, then top with the ribs.

Add seasonings, then pack brown sugar atop the ribs.

Cook on Low for at least 8 hours.

After cooking in the CrockPot, transfer ribs to a broiler pan.  Baste ribs with BBQ sauce.  Broil for 5-10 minutes. 

Verdict: Keeper, with revision  

I loved how tender the meat became from cooking in the CrockPot. Next time, I think I'll broil the ribs for a little longer to carmelize the BBQ sauce.  Also, I may try a different beer, just to see how it affects the overall taste.     

Monday, January 17, 2011

Chicken 'n Dumplin's-- CrockPot Style


If it's chicken smothered in a gravy-esque sauce, The Mr. can't get enough.  Throw in some doughy/carby goodness, and he'll call it his favorite.

Recently I compiled a recipe book for a friend's Christmas present, and gave it to The Mr. to peruse.  "Where's the Chicken 'n Dumplin's recipe?" he asked.

"The one for the CrockPot?" I replied.

"Yeah, that one.  It's probably my favorite thing that you make."

Beat.

.... I cannot tell you the last time I made this meal, but it apparently left quite an impression.  Had I known that it was held in such high regard, I probably would have made it sometime in the last year!...

This is a great basic recipe because it only has a few ingredients. The bonus? It's another one of those throw-it-in-the-pot-and-leave-it-alone kind of recipes-- and you all know how much I love those :)

Source:  www.allrecipes.com

Ingredients:

4 chicken breasts (And yes, I just threw them in still frozen.  Have I told you lately how much I love my CrockPot?)

2 cans of Cream of Chicken soup

2 T. butter

1 onion, diced

Water (enough to cover contents of the pot)

2 10-oz. cans of refrigerated biscuit dough

Directions:

1.  Combine chicken, soup, onion, butter, and water in CrockPot. 

2.  Cook on HIGH for 4 hours.  

3.  Tear apart pieces of the biscuit dough and add to the mix.  Use a spoon to submerge pieces (This will help the dough to absorb the flavors).

4.  Continue cooking on HIGH for 60-90 minutes.

Verdict: Keeper (with some revision)
While The Mr. is crazy about this meal, I'm still not ga-ga over it.  I'd like to add more herbs and seasonings to see how it goes, maybe some poultry seasoning and pepper.  I'll definitely make it again, though. 

Sunday, January 2, 2011

Pasta Fagioli


I love my Freezer.

This is only a recently developed relationship.  It has only been within the past year that I have truly come to embrace and utilize this under-appreciated half of the appliance.

You see, the Freezer was the Black Hole of my childhood kitchen.  Once something was placed in the freezer, you could forget it. It was gone-- if not forever, at least long enough that you would wonder how long it had been in there when you did see it again.

Chicken breasts that were on sale and required buying them in bulk? Forget about those for another year. 

Pork chops that we could grill out?  Forget about those for at least a couple of months.  

A gallon of ice cream? Well, we never let that get too far out of sight:)   

(Right now, my Mother is reading this and cringing, or laughing, because that's exactly how it was. Sorry Mom! :))

Now that I'm cooking for The Mr. and myself, we often have leftovers.  I will eat leftovers for days and days, until it is all used up.  The Mr., on the other hand, will only eat leftovers for 1 or 2 days before he begins to worry about food poisoning.  There would be recipes that would make so much food we couldn't finish it all before we'd have to throw it out. 

I. Hate. Throwing. Away. Food.

Enter the Freezer. Once I realized that many recipes' frozen/reheated leftovers tasted as good as the first time, I fell in love.  Some soups and chilis taste even better than the first time.  This revelation changed my whole outlook on recipes yielding 8 servings or more.  Now, on days when I don't feel like doing anything, I can pull something out of the Freezer, heat it up slowly on the stove, and dinner's ready. 

Seriously people, that's about as close to food-magic as it gets.

Tonight I reheated Pasta Fagioli, a recipe I tried about a month ago.  As expected, it was (magically) as good as it was the first time.  Just another reminder of why I love my Freezer so much.

Source:  Crockpot Tuesdays (slightly altered, since I don't like to measure veggies)


Ingredients:

1 pound lean ground beef, browned and drained
1/2 large red onion, chopped
2-3 carrots, chopped
2-3 celery stalks, chopped
2 cans (14.5 oz) diced tomatoes, undrained
1 can kidney beans, drained and rinsed
1 can cannellini beans, drained and rinsed
4 cups beef broth
1 jar (16.5 oz) pasta sauce
2 tsp. oregano
1/2 tsp. salt
1/4 tsp. black pepper
1/2 cup dry pasta (to add at end)


Directions:

Brown the meat and drain well. Set aside

Combine all ingredients EXCEPT PASTA in the CrockPot.  Stir.

Cover and cook on LOW for 8 hours (or HIGH for 4 hours). At end of cook time, stir in 1/2 cup pasta. Cover and cook for another hour on LOW.

Serve with parmesan, mozzarella, or any other kind of cheese you like.  Enjoy!

Monday, December 20, 2010

Black Bean Soup


For me, soups are like appetizers-- I don't think I've ever encountered one that I didn't like! So when I found a recipe for a black bean soup, I immediately wanted to try it.  Beans are good for you, and cheap, so how bad could it be?  

This recipe did not disappoint, and it is now on the regular rotation for The Mr. and I.

Source:  Cooking Light, March 2009

Ingredients:

1 lb. dry black beans
4 c. chicken broth
1 c. water
2 c. onions (but I only had about 1 cup available)
1 jalapeno-- ribbed, seeded, and minced (This was my first time cooking with a fresh jalapeno, so I had to learn how to work with the pepper. I found this website that was very helpful.)
3 bay leaves
1 T. cumin
1 T. lime juice
1 tsp. kosher salt
1/4 c. fresh cilantro, chopped
3 T. sour cream
Cilantro sprigs, optional

Directions:

Soak the beans overnight in bowl of water.  To do this, cover the beans so that the water is at least 2 inches higher than the beans. Let soak overnight (8 hours) Drain when ready to use.

In a CrockPot, combine beans, water, broth, bay leaves, cumin, onion, and jalapeno.  Cook on LOW for 10 hours.

After cooking all day, add lime juice, salt, and chopped cilantro. (Before serving, I pureed the soup using an immersion blender to make it creamier, even though the original recipe did not call for this.)

Serve with sour cream and hot sauce, and garnish with sprigs of cilantro.

Verdict:

It's a keeper!  I'm glad I pureed it a bit, because I really liked the creamy texture.  

Saturday, December 18, 2010

Baked Macaroni and Cheese


Never have I ever made macaroni and cheese.

I tried to make Baked Macaroni and Cheese one time.  It's been so long ago that I almost forgot about it.  It was a recipe from a Better Homes and Gardens Cookbook, and I remember doubting myself (and the recipe) as I was making it.  Tasting it confirmed all my suspicions; neither onion nor breadcrumbs belonged in Macaroni and Cheese.  

Since then, I have been on the lookout for a Macaroni and Cheese recipe that would fit my specific requirements in order to be tested.  Disappointment abounded during those years, since every recipe I found had ingredients that I was hoping to avoid.  Have you ever tried to search Mac and Cheese recipes?  It's harder than you think to find one without onions, breadcrumbs, cottage cheese, ricotta, heavy cream, or cream-of-something-gross soup!

Then one day, I found it.  The one. The ingredients? Pasta. Butter. Cheese. Milk. Salt and Pepper.  Perfect! Thank you, Jesus! Or, more specifically, thank you Melissa from Lemons and Love.

This has been bookmarked for several months-- but today was the day.  It's baking right now, and I can't wait! :)

Source:  Inspired by Lemons and Love (slightly modified)


Ingredients: 

16-oz. box of elbow macaroni
16 oz. Velveeta, cut into cubes
16 oz. Shredded Monteray Jack/Mild Cheddar blend (I prefer to use two 8 oz. bags instead of one big bag)
1 stick butter, quartered (Then, each quarter gets sliced into smaller pieces)
1 c. milk (I used skim because that's what we drink)
Salt and Pepper, to taste

Directions:

1.  Preheat oven for 325 degrees.

2.  Cook the pasta according to directions on the box.

3.  In a baking dish (I used a Pyrex 8x10), evenly distribute a quarter of the butter pieces.

4.  Layer in half of the cooked pasta.  Follow with half of the Velveeta, then 8oz. of the shredded cheese blend, another quarter of butter pieces, and salt and pepper. 

5.  Repeat last step.

6.  End the last layer with butter pieces on top. Pour milk evenly throughout the whole dish.  

7.  Bake at 325 for 45-60 minutes, till cheese is bubbly and browned in some spots.

Make-Ahead Tip:  Do everything listed above EXCEPT adding the milk.  Cover and refrigerate.  The day you choose to bake it, let the dish come to room temperature, add the milk, then bake as directed. 

Verdict:
I can barely type.  I'm in food coma.  :)

Upon sampling the new recipe, The Mr. informed me that I will be required to make this at least once a week :)  As much as I enjoyed this, we'll have to see about that...

Sunday, October 17, 2010

Hashbrown Egg Bake


So... a couple of Saturdays ago, The Mr. and I woke up from a long night of fun and debauchery... and on such mornings, I crave a breakfast with some carbs.  Potatoes, to be specific. Since we normally don't include potatoes in our weekend morning breakfast routine, I didn't have a go-to recipe to satisfy my Carb-needs.

Enter Allrecipes.com. 

Have I told you how much I love allrecipes.com?  This may sound dramatic, but this website is the main reason I originally started cooking.  If you create an account with them, you can have a "Daily Dish" emailed to you once a day.  If it sounds good, you can print it or save it in an online recipe box; if it doesn't sound good, just delete it.  Before I knew it, I had a great variety of recipes at my fingertips-- all of which seemed simple enough for a novice cook like me.  

Back to Saturday morning.  I needed a recipe that involved eggs, bacon, and potatoes.  So I went to allrecipes.com, performed a search with those ingredients, and found this Hashbrown Egg Bake. Since it was just the two of us, I cut the recipe in half, which ended up yielding the perfect amount for us. The recipe listed here, however, listed the original amounts. 

Source: Allrecipes.com  


Ingredients:


1 (30 oz.) pkg. frozen hashbrown potatoes, thawed


1 lbs. bacon, cooked, drained, and crumbled


1 c. shredded cheddar, divided


1/4 tsp. salt


2 c. milk


8 eggs


pepper, to taste


paprika, to taste


1/4 tsp.


Directions:


1.  In a large bowl, combine hashbrowns, bacon, 1/2 c. cheese, and salt.  Spoon the mixture into a greased 9x13 baking dish. 


2.  Beat milk and eggs together in a large bowl. Add pepper.  Pour mixture over hashbrowns.  Sprinkle with paprika. 


3.  Bake at 350 for 45 minutes, or till golden.  Remove from oven, and add remaining cheese.

Verdict: Keeper!

Bonus-- it kept well till Sunday morning, so we reheated leftovers and had an easy, but deliciously satisfying breakfast.

Sunday, September 19, 2010

CrockPot Chicken Stroganoff


It's fall.


Okay, so maybe the calendar still considers this to be summer, but once we can sleep with the windows open and snuggle under the covers, I'm ready for football, beautiful trees, and comfort food!

...like I need an excuse for comfort food...


(To clarify, I reserve the title of "comfort food" for dishes that meet the following requirements):


1. It involves some kind of meat in some kind of thick sauce. Gravy qualifies as a sauce.


2. It involves a starch of some kind. Potatoes, noodles, rice, etc.


3. It cooks while I get to watch football :)

Since this recipe looked to satisfy all those requirements, I went ahead and tried it. 

Source: Modified from allrecipes.com


Ingredients:

4 chicken breasts

1/2 c. water

1 (.6 oz) packet of Italian salad dressing mix

8 oz. mushrooms, sliced

8 oz. fat-free cream cheese

1 (10.75 oz) can fat-free cream of chicken soup

Directions: 

Place chicken, water, salad dressing mix, and mushrooms in a CrockPot.  Cook on LOW for 5-6 hours.

Combine cream of chicken and cream cheese.  Add to the CrockPot and cook on HIGH for 30 minutes.

"Chunk" the chicken in the CrockPot into smaller pieces.  Mix well, and serve over egg noodles or rice.


Verdict: Keeper!

This has officially been added to the recipe box! :)

Sunday, August 22, 2010

CrockPot Pulled Pork


While reading this recipe, I had a hard time believing that it would be any good.  Growing up, I was always taught "if it sounds too good to be true, it probably is."  Well, this recipe meets all the qualifications to fall under the "too good to be true" category. 

  • It has 3 ingredients.
  • It is low maintenace.
  • It makes a lot of food, cheaply.
  • The Mr. and I both like this meal.

I was hopeful that this recipe was as tasty as it was simple, because if it was, this could easily become another staple in our house!

Soure:  allrecipes.com

Ingredients:

3 lbs. pork shoulder

1 can diet root beer

Your favorite BBQ sauce (I used Sweet Baby Ray's)

Directions:

1.  Place pork shoulder in the CrockPot.

2.  Pour root beer over the meat.

3.  Cook on Low for 8 hours or High for 4. 

4.  During the last hour, use a baster to remove most of the juices.  Remove the bone, and place the meat in a separate container and shred  it with two forks.  Also, remove any excess fat from the meat.  Add desired amount of BBQ sauce, stir, and place back in the CrockPot to cook for approximately another hour.

Verdict:

This is a KEEPER!  It sounded too good to be true, but it wasn't! The trick, I think, is using the pork shoulder cut of meat... there was enough fat within it to not only give it great flavor, but it made it very easy to pull apart after it had cooked. The only thing I may try differently is using regular root beer instead of diet root beer, but that's because I can't ever leave a recipe alone :)

Friday, August 13, 2010

Gravy


What I have learned:

1) Making gravy is a piece of cake.

2) Making it more photogenic is a bit more of a challenge!

Since I was making Beef Stew, and remembered that I always end up wishing I had some gravy for it, I decided to take the plunge and make some gravy from the drippings contained in the CrockPot.  Gravy hasn't been something I have tackled recently, since my first (and last, till now) attempt was a little hair-raising. 

(Let's just put it this way... it involved Thanksgiving dinner at my house, my first time hosting, and my Mother-in-Law and my Mom in the kitchen with me both trying to show me how they make gravy.  And no, they weren't the same methods.  I felt like either method I chose, I was going to hurt someone's feelings.  Oy.) 

I want to curl up into the fetal position just remembering that moment.  

But anyway, I'm a big girl now, and I dove into making it on my own using what I remembered of that Thanksgiving near-meltdown. 

Source:  My Mom

Pretty much, you need 3 things to make any kind of gravy...

Drippings from the meat (I started with about 2 c.)-- I used a turkey baster to get the drippings out of the CrockPot and into a measuring cup.  Ideally, I'd use one of those nifty fat-separating cups with a spout, but that will have to wait till I get one!) 

Milk-- I started off with about 1/2 c. 

Flour-- I think I used about 1-2 T.

And just for good measure, I also ended up adding about 1 tsp. (maybe more) of beef-flavored soup base.  If I were working with chicken or turkey drippings, I'd use a chicken flavored soup base. 

Directions:

1.  In a saucepan, heat the drippings on medium heat. 

Here's the part that my Mom swears by... and I think I'll end up swearing by it, too...  


2.  In a Tupperware shaker, combine the milk and flour.  Shake well till flour is mixed thoroughly with the milk. 
3.  Stirring constantly with a whisk, add the milk mixture to the drippings. 

4.  Add soup base.

5.  Continue stirring for several minutes.  Gravy will thicken. 

Verdict:

Keeper!  The Mr. said that his Mom, a gravy expert, would love it.  That's good enough for me! :)